Posts

Showing posts from November, 2015

TechSmith CyberMonday Sale!

Image
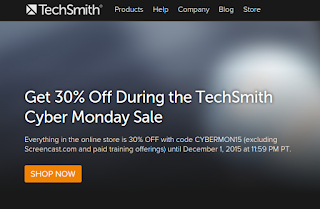
Ever wonder what I use to create my annotated graphics & short videos?  Here's my secret - TechSmith's SnagIt.  Very easy to use software for screencapturing - both images and videos. And today - they are having a CyberMonday Sale.  You can get it for 30% off using the code CYBERMON15.  If you are an educator, this means you get it for $20.96 instead of $29.95. If you already have an older version of SnagIt, you can upgrade for $10.46 instead of $14.95!  Well worth it for the newest features. Truthfully, I am not paid in any way, shape or form to promote SnagIt.  I just find it to be a very useful tool, and want others to know about it.

FREE Resource: Digital Driver's License

Image
From "Big Deal Media" - Just as motorists take driver’s education to learn how to recognize and react to road situations, digital-age students need a course in how to navigate precarious situations online, such as cyberbullying and copyright infringement. That’s what led ISTE to develop the Digital Driver’s License (DDL) project , a free and easy-to-navigate resource that schools or individuals can use to teach and measure digital citizenship proficiency .  DDL is both a platform and curriculum ... From ISTE DDL Site -  The idea of being a good digital citizen becomes more important as schools start to adopt 1:1 initiatives, get more comfortable with students bringing in their own technology and use various technology as a part of the learning process. Where does this get taught? Who teaches it? How do we keep track of all of this? How do we know what areas need addressing and/or follow up? The DDL project allows learners (wether they be students or teac

Google Forms - A New Version of Forms is Here!

Image
Yesterday morning I created a form...today I was prompted to update it to the newest version of forms.  Such is the perpetual cycle that is Google! Here's a brief overview:  1. A new updated, sleeker look - a great improvement, in my humble opinion:  2. A new tab to view responses right within the form.  You can still access the spreadsheet of responses, but for all those times you don't need the entire spreadsheet this is a great addition.  Also, there is now a slider to turn on/off the form: 3. A new icon to set the color or select the theme.  Themes have a new and improved way of previewing and selecting:  4. There is a preview icon that matches the preview icon in Google Drive: 5. The settings are found by clicking the gear icon above - again a match to what you see in other Google Apps (I love consistency...).  Settings are grouped into a new order, one that is a little more intuitive.  Choosing who can respond is now a drop down that help bett

Voices of History - FREE storehouse of Primary-Source based lesson plans

Image
 Voices of History is the Bill of Rights Institute ’s free digital storehouse featuring the best of the institute’s primary-source-based lesson plans . Written by teachers for teachers, the materials are aligned to content standards, and are searchable by topic and accessible anywhere on any device. One of the featured lessons (“What Are the Origins and Interpretations of the Right to Keep and Bear Arms?”) explores the origins of the Second Amendment in the Bill of Rights, as it was included to reflect the concerns of many citizens in a number of states. Another featured lesson (“The Responsibilities of Frederick Douglass”) takes an in-depth look at responsibility— striving to know and do what is best rather what is most popular—through the life of Frederick Douglass.
REMC 12E Sponsored Professional Development Opportunities January - June 2016 The following is the current list of REMC 12E sponsored professional development opportunities.  What does it mean to be REMC 12E sponsored?  The PD cost is either significantly reduced or FREE for educators that work for REMC 12E school districts (Branch & Calhoun counties).  Educators that work elsewhere may participate, but with full course registration fees. 21 Things for iPads - Online, self-paced More Information February 3 - April 28 4-50 SCECHs available, depending on completion items Blended Learning in the Classroom - Blended (mostly online) More Information January 11 - May 23 62 SCECHs available Build a Website with Google Sites - Online More Information January 11 - February 26 March 7 - April 22 May 2 - June 17 Discovering with Technology for Learning - Blended (mostly online) More Information January 13 - February 24 30 SCECHs available Differe

Documents of Freedom - FREE Digital Course from Bill of Rights Institute

Image
The Bill of Rights Institute has developed Documents of Freedom , a free , comprehensive , interactive digital course covering all the history, government, and economics topics in traditional textbooks. Written for teachers by teachers, all materials highlight primary sources and meet state standards. Teachers can search for primary-source-focused resources that fit seamlessly into their teaching plans. They can access student readings along with corresponding teacher materials, including classroom activities, presentations, and assessments. Incorporated into the readings are engaging images and videos that provide a more interesting way for students to interact with historical content. The course material is available everywhere from a laptop to a cellphone, from the computer lab to students’ homes. Students can easily adjust the display of the text and choose the style and size that works best for their individual preferences and learning needs.

PD Opportunity - FREE Online Google Sites PD

Image
After conversations with several local districts, I'm putting together a self-paced online course on creating your website with Google Sites.  (It is about 1/3 done.)  I'm looking for some people that are interested in going through the course - both to create their own website, and to provide some feedback on ways to improve it.  If you are interested, fill this form out .  I will contact you with the details. 

Google Sites - Creating a Customized Template

Image
One useful feature that many people do not know about is the ability to create your own custom template pages to use on your site.  This can be nice for several reasons: You are going to be creating multiple pages with a similar layout You are going to be creating multiple pages with similar content You want multiple pages to have the same settings Or any combination of the above! Creating your own template is easy - 1. Set up the content/layout/features that you want for your template in a new page (or you can open an existing page that already has all this!) 2. Go to the Gear and select Save as page template   3. Name the template, and select where you want pages created with this template to save 4. Make any additional changes you want to the page (adding or deleting content, etc) - then Save just like a regular page. To use your new template, when creating a new page click the dropdown under Select a template to use - your templates will be added to the bottom

Google Sites - Turning Commenting Off on a Google Webpage

Image
You may have noticed on one or more of your pages that the default setting is that visitors have the ability to add comments and attachments. As this isn't always ideal, below is how you turn this feature off on pages you do not want that option. 1. Click on the gear that is located near the top right (you can only do this in preview mode - if you are in edit mode you will need to Save or Cancel to return to preview mode): 2. Select page settings: 3. Look for the Page Settings option:   4. Uncheck the boxes next to Allow attachments and Allow comments: 5. Click Save.  When you return to your page the area to add attachments and comments are no longer there:

Google Calendar - Sharing a Calendar Just Got Easier

Image
There is a new menu setting for your public calendars that makes sharing it with others easier than ever! Here is what the new option looks like if you are in a Google Apps for Education domain: Here is what it looks like if you are on your personal Google account: Selecting either, you get a strikingly similar pop-up to type in the email of the person (or persons) you want to share your calendar with, and area for an email message: (I, personally, find the differences in the suggested messages humorous.) The key to having this new option - and one to think hard about before deciding if it is worth it - is having your calendar completely public.  This includes showing all event details and making it searchable by Google:

Google Calendar - Access to Deleted Events is Here!

Image
Today I deleted a duplicate event on my calendar (one of those events I created, and then received an invite from the organizer...).  A few minutes later, I received an email in my inbox: This is an awesome upgrade to making Calendars have similar features to other Google products! So notes from the email & what it means: 1. deleted events are stored in THAT calendar's trash.  Where is that?  It is a new option under the calendar settings: 2. deleted events will reside in the Trash for 30 days, same as your GMail, and Google Drive items. 3. deleted events can be restored by selecting it and then clicking the restore button 4. the trash can be emptied "manually" at any time Shared Calendars: Note that "user's with Make changes and manage sharing” or “Make changes to events” permission for a calendar can access Trash."  This is only talking about the Trash for that shared calendar as each calendar has it's own Trash.  While it doe

Drive Smart: Teen Digital Short Contest

Image
From the site Drive Smart Now : START MAKING A DIFFERENCE TODAY:  CREATE A DIGITAL SHORT TO HELP COMBAT DISTRACTED DRIVING You can help save lives. Accept the challenge and create a digital short to convince your peers not to drive distracted. Scholarships and grants will be awarded to students and teachers.  From MACUL's Big Deal Media: " The Wireless Foundation has launched the second year of its Drive Smart: No Distractions, No Excuses Teen Digital Short Contest . The competition challenges students aged 13–18 to create a digital short to persuade their peers not to drive while distracted.... The Wireless Foundation partnered with By Kids For Kids (BKFK) to create the Drive Smart campaign. The program’s website provides teachers, parents, students, and community leaders with free downloadable activities and information on the dangers of driving while distracted." Deadline: December 15, 2015 Prizes: Grand Prize: $5,000 scholarship (teacher/men

Webinar - Explaining the Refuge Crisis in the Mediterranean

Image
"The refugee crisis in the Mediterranean is one of the most significant humanitarian crises in a generation. What is causing the mass migration of hundreds of thousands of people in the region, and how is the international community responding? Join us as Professor Noora Lori of Boston University, an expert on migration in the Middle East, and Barbara Petzen of Middle East Connections discuss the roots and significance of the crisis, as well as strategies for talking about it in your classrooms."   DATE: Nov. 12, 2015 TIME: 7:00 – 8:15 p.m. GRADES: K-12 FEE: Free Click Here for More Information

Google Sites - Inserting a Video onto a Google Webpage

Image
If you are into multimedia on your Google Site, you probably would like to have a video or two.  First, a couple words of caution about video - I wouldn't recommend putting video on your Home page - if your site is about accessibility and some of your visitors are connecting with slow internet the load time could turn them away before they even see your site! The average attention span for a video is 3-7 minutes (depending on what study you read) - keep that in mind, along with the fact that the longer the video the is the more bandwidth and/or data it will be using So, if you use video - which can be very effective - use it sparingly. To add video to your site, first load it into your Google Drive.  This is hands down the easiest way.  Then when in edit mode on the page you want the video: 1. Go to the Insert Menu, select Drive (on the right side) and then choose Video:   2. In the window that pops-up, you can use the search bar to find your video: 3

Google Sites - Image Settings on a Google Webpage

Image
Once you have selected an image and inserted it on your webpage, you have some setting options to choose from: Alignment - you can have it left, center or right aligned.  Note that left and right alignments for images will allow you (with another setting) to have the text flow around the picture. Size options - there are several size options so you can fit the picture as you want it on the page Text wrapping options - decide if you want the text to wrap next to the picture, or to be located just above and below it. Remove - to remove the picture from the page Selections do save as you pick them. The settings bar disappears when you click off the picture.

Google Sites - Adding an Image from Google Drive

Image
While it would be nice if Google simplified the image options (like they have in Documents), if your image is stored in Google Drive you go about inserting it a bit differently.  1. Click on Insert and go to Drive 2.   Select the Image option here.  3. This will let you search and select the image from your Drive.  That's it!  Just not intuitive when you have an Image option right under the Insert, but it does show how easy it is to integrate something that is already stored in your Google Drive.

Google Sites - Uploading an Image from your Computer (Device)

Image
The best way to "jazz" up your web pages so they are attractive to visitors is to add images.  Usually images selected for a web page tell either something about the content of the page, or something about the website owner.  One word of advice - make sure the image you want to use is in an accessible area (for instance NOT inside a picture app where it might be difficult to identify and select it).  To add an Image: 1. While in Edit mode, go to the Insert Menu and select Image 2. To find and select a new picture, click on the Upload Images button. 3. In the pop-up window, you will find and select the image from it's location on your computer.  4. Google will upload it to your site. Once the image has been uploaded to the site, you are able to use it anywhere on that specific site, as many times as you wish.

Google Sites - Adding & Modifying Text

Image
Once you have created your page in Google Sites, you probably want to add content! The most basic of content types is text.  To add text, you can: type it manually copy & paste it from another source Make sure you have enabled Edit Mode on the page prior to trying to add text.  You will know you are in edit mode as there will be greyed dotted boxes around the content area(s) and the formatting toolbar will be visible.   The formatting toolbar allows you to do the following: Undo/Redo Change font type, font size, font color & font background Use bold, italics & underline Add hyperlinks Use ordered & unordered lists Indent text to the right or left Justify text to the left, right or center At the end are a couple of additional icons.  The first (shown to the left here) will attempt to strip code out of text that has been copied from another program and pasted onto the page.   The second is the one to toggle into HTML code view, so the code can