Posts

Google Script - Create a Multiple Choice Quiz from Questions in a Spreadsheet

Image
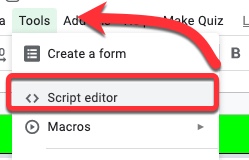
Recently I was asked if there was a way to create a multiple choice quiz from a spreadsheet which had the questions and answers already in it.  A colleague (thank you Andy Mann !) found a script created by Jason Jurotich which we were able to simplify and adapt for our own purposes with the  REMC project  21Things4Students .  Our modified script creates a Google Form multiple choice quiz from the active sheet (the one you are currently looking at) in a Google Spreadsheet.  If you have multiple sheets with questions (say 1 sheet for each chapter), you can create a new quiz just by running the script again on a different sheet!  Below is how to add the script, what it does, and what you may want to modify -   Adding the script 1. First, while in the spreadsheet you are going to use (whether the questions are set up or not), go to the Tools Menu - Script Editor 2. Delete out the code that is there. Copy and paste in the script found in the document  Script - SS to Quiz .  Ge sure to cop

Google Script: Sending an Approval Email from Form/Spreadsheet Data

Image
I was asked to create a script that would send an approval email once a request was approved - for 2 separate groups, and to be used for 2 different reasons!  The example below is being used for building access approval (RE: the work-at-home requirements due to COVID-19).  The other way this was used was for approval of spending requests.  These utilize an additional column that is marked (in these cases) with a Yes that will trigger the email, then if an email is sent it makes that notation in the final column.  Note - the script will break (stop running) if someone submits a non-working email from a form, so I recommend having the form auto-collect the email. Here are the directions for using the script -  Creating and Sending the Email 1. Create the spreadsheet  You can either do this with a New Spreadsheet, adding the data fields you want  OR Create a form with the data you are collecting and have it create the companion spreadsheet Important :  Be sure to include email address! Yo

Google Meet - Add a Jamboard within Meet

Image
You can now add a Jam (Jamboard) from right within Google Meet!  (This features has been going live since the first of October.  If you do not see it yet, it will appear shortly...)  For those that have not checked out Jamboard, it is an interactive digital whiteboard you can use with others.  It can be especially useful with touchscreen Chromebooks.  When in you Meet, click on the More Menu (three stacked vertical dots) in the lower right corner - Select Whiteboard at the top of the menu - You can select to either start a new whiteboard, or if you have set up a template or pre-created jam you can open an existing one from your Drive - You will decide the permissions that others in the Meet have to the Jam. They can either have edit rights, or view only rights (eg. if you are demonstrating to them).  You can also select that anyone with the link can edit - When you set the permissions, it will then share a link to the Jam in the Chat section of the Meet -  You can resize your window to

Google Classroom - Pick a Random Student

Image
 If you have Google Classroom on your mobile phone,  there is a new feature that will randomly select students for you and allow you to track who you have selected (and not selected). To use this feature, start by clicking on "People" at the bottom of your classroom -  Click on the icon in the upper right corner -  You will get a welcome screen, click on START to start using it -  It will randomly select a student.  You can choose from the following options: CALL LATER - will put them back in the "pool" to draw from  ABSENT - will move them to the absent list so they are not called again NEXT - will move them to the PICKED list  At any time, you can see the number of students you have not selected, selected or marked as absent - Clicking on any of those options will provide an actual list of students that are in each group -  At any time you can reset with the Reset button at the upper right corner -  If you select all the students, you will see an "End of Sess

Google Meet - Introducing Host Controls

Image
 There are new Host Controls available within Google Meet.  These features are still rolling out, so it may take up to two weeks to see some of them. You will know that you have access to Host Controls by seeing a blue shield in the lower left corner of a Meet -  When you click on it, you see a pop-up that has some options available to you -  1. Quick access - if it is on (the default) people within your organization DO NOT need to ask to join the Meet; if it is off (slider to the left and not blue-green) then EVERYONE will need to ask to join your Meet and you will have to let them in. 2. Share their screen - does everyone have the ability to share their screen, or just you.  This will determine if the Present Now in the lower right hand corner of the Meet is displayed to others - 3. Send chat messages - does everyone have the ability to chat during the Meet.  This will determine if the chat icon in the upper right hand corner of the Meet is displayed to others -  You can also access

Google Classroom - Assign Items to Multiple Classrooms

Image
When adding material in Google Classroom, many people do not know that you are able to add that item to multiple Classrooms when you are creating it!   IN CLASSWORK: To add an item, such as an assignment or material, to multiple classes, when you are creating it look to the menu options on the right side under where it says "For" -  Click on that dropdown.  You will see a list of all your Classrooms with a checkbox next to each.  Check all the courses you want the item to be in -  After you are done, it will switch to tell you how many classes the item is going to be created in -  IN THE STREAM: when adding an announcement click on the dropdown under "For" -  Check all the classes you want the announcement in, then proceed as normal. That's all there is to saving time by creating items in multiple classes at one time. Thank you for joining us for this episode of Technology Tidbits, brought to you by Melinda Waffle (Calhoun Intermediate School District), and CJ W

Google Classroom - Emailing Students

Image
 After seeing a couple teachers laboriously type in the email of each student from a Google Classroom, it occurred to me I should show how you can easily email all - or even just some - of students in a Classroom.   First, click on the People tab at the top. If selecting all students, click on the top checkbox -   If selecting a subset of students, check the boxes next to the students you want to select -  Once you have the boxes check, click on Actions and select Email- A new email will open up in a new tab.  Notice that all the students are in the BCC field so they are not aware of who you did (or didn't) email which helps keep you FERPA compliant -  Compose your subject and email message, then send! Thank you for joining us for this episode of Technology Tidbits, brought to you by Melinda Waffle (Calhoun Intermediate School District), and CJ Walker and Du Bui (Jackson County Intermediate School District) - members of REMC - RITS